When I started this website back in 2000 it was only intended to be diary that would allow others to share the nest images we were enjoying as our Blue Tit family developed in front of a cctv camera (hidden in a plastic clown's face) I had been fortunate to buy at greatly reduced price at a local Tandy store. Then, I was able to obtain a couple of CCTV cameras at a local carboot sale just in time to cover the nesting of a pair of Robins just after the Blue Tits had fledged. That led to me setting up my first webcam.
Until 2002 the cctv cameras used were black/white models, so colour images were taken using still cameras. At first I used my 35mm film cameras for this job, but this meant delays as film was developed and so the diary had to play 'catch-up' with events. It wasn't until the purchase of our first digital camera and the ability to get pictures into the diary within minutes of being taken, that the garden and pond diaries were able to get going properly in 2001.
The range of photographs required to cover the many aspects of the garden's wildlife have stretched the cameras' (both digital and cctv) capabilities to the limit and it has sometimes been a challenge to adapt them to my requirements.
The following sections give you some idea of the main equipment that has been used in the production of the diaries so far:
-
The Canon 20D and 5D digital cameras
Using extension tubes with the Canon EF 100mm f2.8 Macro lens - 1
Using extension tubes with the Canon EF 100mm f2.8 Macro lens - 2
Using extension tubes with the Rodenstock Rodagon 28mm f/4 enlarger lens
Using extension tubes with the Canon EF 300mm f4L lens
Macro frame size guide for 20D
- The Olympus E-20
digital camera
- The Olympus 2100UZ
digital camera
Accessories
Close-up Adaptors
'Macro' Adaptors (including chart of areas covered by adaptor lenses)
Using Flash
Adding an Angle Finder - The Fujifilm
4700Zoom digital camera
-
TV/Video Equipment
-
Computer Hardware
-
Computer Software
-
Web Design Books
- 'Aquariums'
The Fujifilm 4700Zoom
Our first camera was a Fujifilm 4700Zoom digital camera. I was very pleased with the results obtained with it although I wish it could have focused closer. I made up an adaptor to get round this problem and to allow me to use add ons such as a polarising filter with it.
The Olympus 2100UZ (- now, gracefully retired)
While the Fuji produced good results, I needed a camera that would more closely match the capabilities if my 35mm kit, and at the end of February 2002 I bought an Olympus 2100UZ.
Although it has a lower resolution than the Fuji, it has a x10 optical zoom lens with image stabilisation. This allowed me to get more images of the more nervous visitors to the garden (especially the birds) as well as helping me to 'stretch' to places the Fuji could not reach.
Like the Fuji it does not have a good macro capability, but the ability to screw filters onto the front of the lens means that I could improvise much more easily than with the Fuji. The remote control that comes with the camera allowed me to take macrophotographs without having to press the shutter - so no camera shake.
Accessories
Gradually, I acquired a number of extras for the Olympus in order to extend its capabilities.
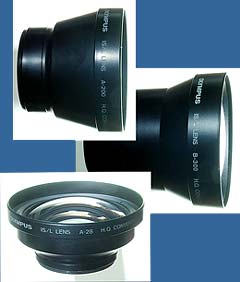
These three Olympus adaptors, include the A-200 and B-300 telephoto adaptors, and the A-28 Wide-angle adaptor.
The B-300 is a 1.7x adaptor and is of excellent optical quality. It was always available for bird photography in the garden ( and sometimes used along with a Tokina adaptor - see below). However, there were times when I wanted to focus closer than it permits, and this is where the A-200 (a 1.5x adaptor) came into use.
The A-28 is a 0.8x adaptor that I found very sharp. It is not only useful for extending the wide-angle capability of the camera to 'get more into the shot' but when used for close-up shots can give an interesting perspective - nice when getting close to a frog!
 I
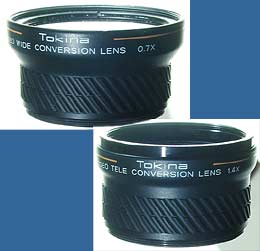
obtained these two Tokina adaptors as a set. They are intended
as video camera adaptors, but they have 49mm threads which means
they screw straight on to the Olympus, and their quality is pretty
good too.
I
obtained these two Tokina adaptors as a set. They are intended
as video camera adaptors, but they have 49mm threads which means
they screw straight on to the Olympus, and their quality is pretty
good too.
The wide-angle adaptor has a conversion factor of 0.7x so is a bit 'wider' that the A-28, but suffers a bit from lower image quality around the edges so the advantage is somewhat lost. The tele-adaptor has a factor of 1.4x.
These adaptors have filter threads at the front so that filters can be added, something missing (annoyingly) from the Olympus lenses. The presence of this thread means that I could, and often did, add one of the Olympus tele-adaptors onto the front of the Tokina tele-conversion lens.
By using it with the B-300 I could boost the 2100UZ's lens (at maximum zoom) by 2.38x, from 380mm to the equivalent of a 900mm lens on a 35mm camera! There is a bit of vignetting (darkening at the corners) but the combination was used very successfully numerous times.
Close-up Adaptors
 The camera's close-focusing needs some
help for much of my garden photography, and I have several lenses
that I used for this task.
The camera's close-focusing needs some
help for much of my garden photography, and I have several lenses
that I used for this task.
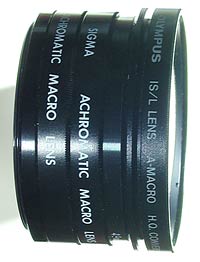
The first is an Olympus A-macro lens. This has a slot running around the circumference into which you can fit a diffuser which ensures that the camera's flash produces an even light over the subject.
On its own this lens still didn't take me close enough to many of the subjects I wish to photograph, so I used a pair of Sigma Achromatic macro lenses. These have 52mm filter threads, so need adaptor rings to fit onto the camera. The optical quality of all these lenses is superb and I often use them all, stacked as shown in the picture with few worries about losing image quality.
The Sigma lenses were also useful when mounted behind the A-200 or B-300 lenses for damsel-fly or butterfly photographs.
There were times, however, when even these lenses would not let me get close enough to some of the tiny inhabitants of the garden, and then I had to resort to a different sort of adaptor.
'Macro' Adaptors
I have three high quality Rodenstock Rodagon enlarger lenses, 50mm, 80mm and 105mm focal length. These have 40.5mm filter threads on them, and by using two Cokin filter system adaptor rings glued back to back I am able to mount them onto the camera. In addition, I also have a Rodenstock Ysaron 25mm enlarger lens for extreme close-ups. I needed to glue on a suitable threaded ring to this on to allow its use with the adaptor. Vignetting means that this lens give a circular image, even with the camera set at maximum zoom.

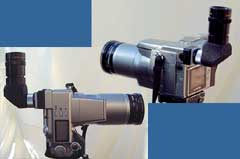
Here, the Olympus is set up ready to take pictures of a developing frog embryo in March 2002.
The camera is mounted on a two-way adjustable focusing rail. This rail allows for small movements of the camera.
The camera is used in manual focus mode, and the focusing rail allows for easy adjustments to the camera/object distance.
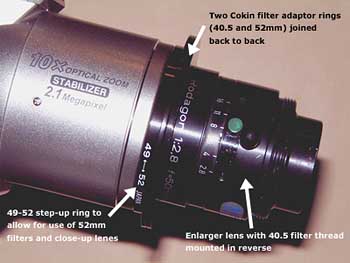
This close-up of the enlarger lens shows how it is attached to the 49mm filter thread of the Olympus lens.
The picture shows a 49-52mm step-up ring in use. Since this picture was taken I now use just an adaptor made with 40.5 and 49mm Cokin adaptor rings.
In use, the apertures on the lenses are always at the widest setting, otherwise vignetting would become unacceptable.
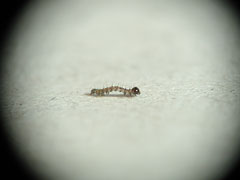
This (nearly) side view of a larva measuring approximately 1.5mm moving quickly across a newspaper(6 Sept 2003) was taken using the 85mm lens.
You can see clearly the extremely restricted depth of field experienced when shooting at these short distances, with the focal plane reaching across the middle of the image.
Click on the image to see a larger version
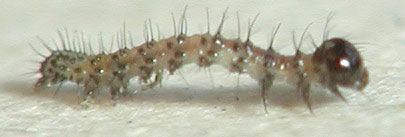
This 'actual size' portion of the original image shows how the head is not actually in that focal plane and so is less sharp that the middle/rear portion of the body.
I have set out on a separate page a comparison of the areas covered by the different lens combinations I use for close-up/macro work.
Click here to see this chart in a new window
Using Flash
 While
the camera has a built-in flash, it has limited use for close-up work
because of the shadow cast by the lens. When flash was required
I usually resorted to a external unit connected via an Olympus
adaptor lead.
While
the camera has a built-in flash, it has limited use for close-up work
because of the shadow cast by the lens. When flash was required
I usually resorted to a external unit connected via an Olympus
adaptor lead.
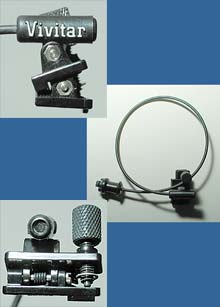
The Olympus flash unit intended for the 2100UZ is very expensive, so I use this Vivitar 2500 Zoom Thyristor flashgun, usually mounted on a 'L' shaped bracket, using a swivel mount so that it can be tilted down for macro work.
The picture shows a diffuser over the flash head. This was made from a toothpaste tube and has black tape across the lower part to minimise the effect of the flash on the flash sensor below.
 This
unit does not permit the use of TTL flash metering, having instead
the small sensor at the front of the flashgun. This can be a
problem, especially if there are extraneous objects about that
can reflect light and give the sensor a false reading.
This
unit does not permit the use of TTL flash metering, having instead
the small sensor at the front of the flashgun. This can be a
problem, especially if there are extraneous objects about that
can reflect light and give the sensor a false reading.
However, Vivitar sold a simple solution to the problem when this flash was being marketed. They came up with the device shown here (I think it was called a macro photo sensor, or something similar).
It consists of a short length of optic fibre with a plug at one end to attach to the flashgun (see picture above). At the other end is a small clamp, intended for attachment to the filter threads of the camera lens. The end of the optic fibre could then be tilted towards the subject -almost TTL metering!
When I used this device, I usually removed the clamp and attach the end of the optic fibre to the lens using blu-tac. Also, I have various, longer lengths of fibre optic cable that gave me more options, such as choosing where I wanted to sense the flash.
Adding an Angle Finder
One thing I found frustrating when using the Olympus was the task of taking shots at awkward angles, eg. horizontal shots down at ground level, or vertical shots such as up at the underside of a leaf.
 Among
my Canon 35mm kit I have two Angle Finders that fit onto grooved guides on
the camera eyepiece. Some time ago I obtained a 'dead' Canon camera and I
removed the rear part of the plastic eyepiece component and fitted it to
the the Olympus.
Among
my Canon 35mm kit I have two Angle Finders that fit onto grooved guides on
the camera eyepiece. Some time ago I obtained a 'dead' Canon camera and I
removed the rear part of the plastic eyepiece component and fitted it to
the the Olympus.
All I needed to do was to remove the glass lens, cut off the flanges by which the frame was attached to the Canon camera, smooth off the back of the frame, and then super-glue it to the Olympus eyepiece, to which it bonded securely. The frame didn't obstruct my view of the viewfinder image.
The Canon Angle finder B gives a 'right-way-round' image and can be rotated through 360 degrees so that the image is correctly orientated as the camera is turned through any position from landscape to portrait, and even upside down.
Click on the images to see larger versions
The Olympus E-20
During October 2003 I added an Olympus E-20 to my kit, along with a trio of add-on lenses. A great deal of indecision preceded the purchase as I looked carefully at the new Canon 300D which offers interchangeable lenses.
At that time I decided that I did not want to go down the route of buying into a new system. The success of the 2100UZ and the thought that I could share resources between the two cameras made the choice of the E-20 a comfortable one for me. For high resolution macro work I could still use my old Canon FL/FD based film cameras along with their kit and scan the negatives into the computer.
While the 2100UZ with its 2.1Mp resolution was capable of producing good images for the website and for printing up to 10x8, the 5Mp resolution of the E-20 meant that I would have more pixels to 'play' with, for cropping and for the printing of larger pictures. The January sales in 2004 meant that I was able to buy a Canon S9000 A3+ printer for just that purpose.
Close-up work with the E-20
I was very pleased with the results for moderate close-up work with the E-20, but photographs at anything near a 'real' macro size (near 1:1 or closer) proved difficult to achieve. I did not get the Olympus MCON-35 that was made for the camera, and the enlarger lenses used with the 2100UZ cause too much vignetting on the E-20.
In the meantime I used a Nikon 6T achromatic close-up lens which has a power of 2.9 diopters (just under the 3 diopters of the MCON-35), and two Sigma Achromatic Macro lenses with 58mm threads which do allow me to get close without any vignetting problems. These got me closer to the sort of magnification I wanted to use.
Whatever arrangement I ended up with, the camera needed to be a lot closer to the subject than is the case with the 2100UZ. This is because I use the Uzi at its longest focal length of 380mm for macro work whereas I will need to use the E-20 at just 140mm focal length.
As I often need to maintain a longer camera-subject distance I found that I had to continue to use the Uzi for many of the insect shots I took in the garden.
Eventually, the limitations for macro work became too frustrating, and when Canon brought out the 20D late in 2004 we decided to take the plunge and return to the Canon system. Now, the Olympus E-20 acts as my second, reserve camera, used for general and landscape type photographs when the Canon is set up for specific tasks.
TV/Video Equipment
Choosing a cctv camera - things to consider (in a separate window)
My equipment is made up of an assortment of bits and pieces, largely obtained from car-boot sales, eBay and the local recycling centre.
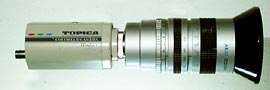 Bought
second-hand on eBay, My main colour CCTV cameras are two Topica TP-6001A
models - very compact cameras, measuring just 11.5cm long, including
connector and lens mount. They have good resolution and work well
at low light levels (0.45lux).
Bought
second-hand on eBay, My main colour CCTV cameras are two Topica TP-6001A
models - very compact cameras, measuring just 11.5cm long, including
connector and lens mount. They have good resolution and work well
at low light levels (0.45lux).
Pictured on one of these cameras is a 11.5 - 90mm zoom lens made by Canon for an Akai TV camera. I have a range of other cctv lenses, from 2.8mm through to 180mm focal length, and also a Pentax 300mm f4 lens with an M42 mount that I can use on a cctv camera via an adaptor. In addition, I have made up an adaptor so that I can use my Canon FL camera lenses on them.
One has a built-in microphone and has been installed in a Robin nestbox for the 2004 nesting season.
The technical details for the camera can be found at http://www.trisak.co.th/tbl/TP-6001A.htm
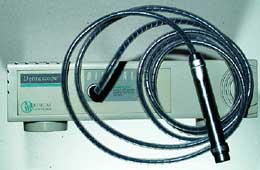 My
third colour camera is this dental model by a company called Dentascope. Bought at a car-boot sale, it was being disposed
of by a dental practice that had bought a newer model.
My
third colour camera is this dental model by a company called Dentascope. Bought at a car-boot sale, it was being disposed
of by a dental practice that had bought a newer model.
Needless to say, its good resolution and close-focusing ability will be very useful, and within a couple of weeks of purchase it was in use, providing webcam images of a Robins' nest in April 2003.
In February 2004 I purchased (via eBay) a second-hand JVC TK-1280E colour video camera with the intention of using it for microphotography - I will be adding more details later.
In addition, I have two small B/W ccd cameras which use C mount lenses and which are especially useful, because of their sensitivity to Infra-red light. They both produce good quality images and have been used very successfully for my birdbox webcams. Unfortunately they require 240volt supplies, so I would like to replace them with 12 volt models at some stage.
A pair of video recorders is available which includes one Panasonic model that will allow me to use a motion sensor with the camera to trigger recording.
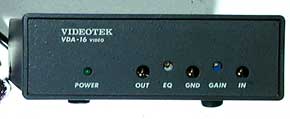
In
order to maintain signal strength over the long cables used between
the birdbox and the house, I use a Videotek VDA-16 video distribution
amplifier, which allows me to connect up to 6 outputs from one
camera.
Before 2004 I hope to have a switching unit that will cycle between cameras so give the webcam arrangement a bit more flexibility.
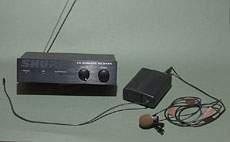 For
the last few years I have used a wireless baby monitor to listen to
activity in the Blue Tit box. Unfortunately it was susceptible to
interference. In February 2004 I was lucky enough to buy a radio
microphone at a local carboot sale.
For
the last few years I have used a wireless baby monitor to listen to
activity in the Blue Tit box. Unfortunately it was susceptible to
interference. In February 2004 I was lucky enough to buy a radio
microphone at a local carboot sale.
This Shure unit has now been installed in the BT nestbox and, hopefully will provide high quality sound if the box is used this year.
The Aquariums
 To
get 'underwater' photographs of pond animals I needed some form of
aquarium that would limit the amount of movement of small animal either
side of the plane of focus.
To
get 'underwater' photographs of pond animals I needed some form of
aquarium that would limit the amount of movement of small animal either
side of the plane of focus.
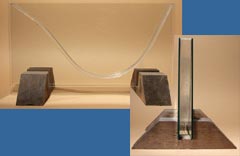
To do this I constructed this tank, comprising of two 300x150mm sheets of 2mm glass kept 18mm apart by a curved strip of perspex and which is bonded together using silicone aquarium sealant. It rests in the two wooden stands.
Having the curved base means that there are no corners to cause problems when it comes to cleaning the tank, and it avoids the frustration caused when an animal decides to settle in a corner. I intend to make a similar tank that has a wider perspex strip before the Spring of 2004
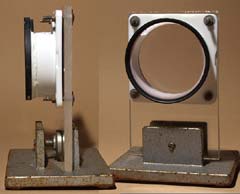
I also use a second, much smaller (and older) tank.
It is made from a white plastic moulding (of unknown origin) which is bolted to a piece of perspex with an o-ring seal between them. To the front I have bonded on a 67mm Skylight filter, and it is through this that photographs are taken. The tank is kept clamped in the heavy base.
Finally, the plastic Ferrero Roche containers, and their lids make for very useful mini aquaria when pond dipping.
Computer Hardware
Up until July 2003 the computer used for the website and webcams was a Fujitsu Pentium III PC with 384MB memory and running Win98. A WinTV card provided a video input so that I could 'grab' images from the ccd cameras and run the webcam.
That computer has now been replaced by machine from Mesh computers. It uses an AMD Athlon XP 2700+ 2.16GHz processor and has 1GB of RAM. The operating system is Windows XP Professional. It had an nVidia graphics card that has video in/out capabilities which I intended to use for a webcam, but I have replaced that with a video card to allow the use of a second monitor. I can use the computer for webcam purposes through the use of a WinTV USB device.
My internet link is a broadband connection via a cable modem. It is this link that has made possible the continuous webcam coverage of the birdbox each Spring since 2000.
I also use Toshiba laptop that can be used to do off-line work on the web site while the PC is being used for other tasks. It also supports the use of our digital cameras (see above) while away from home. The WinTV USB device gives it video input capabilities so that I can use it with a cctv camera. It is not networked to the PC, but a Freecom Traveller CD writer allows me to store images on CD-Rs or CD-RWs and transfer them easily.
Computer Software
On my Mesh computer I use:
Adobe Photoshop CS2 to process the images (having progressed from using Elements 1 and 2).
Microsoft FrontPage 2002 web authoring software.
Corel Draw 12 for page design, including the calendar.
On the Laptop I have:
Adobe Pagemill - Straight forward web authoring software.
I do have Microsoft FrontPage 97 but it sits on my shelf, not
in the PC.
WordPad - for those times when I want to interfere with
what Pagemill produces and experiment.
Adobe PhotoShop Elements 2 and Corel PhotoPaint 8-
used to process the images used on the site.
CaptureEze Pro - from www.screencapture.com, this is used to capture still images from the video input to the computer. It can be set to capture and auto-save a series of images as I watch the video feed.
ISpy and WebCam32 - from www.surveyorcorp.com. ISpy was used to provide the webcam feed of the robin's nest in 2000 and subsequently I switched to WebCam32, which is available on both computers.
Web Design Books
There have been two books that
I have found most helpful in putting together my website:
The Non-Designer's Web Book (2nd Edition) by Robin Williams
and John Tollett.
Publisher: Peachpit Press - ISBN 0-201-71038-2
I have found this book well set out, easy to read and is all
about about web site design.
HTML for the World Wide
Web (4th Edition) by Elizabeth Castro.
Publisher: Peachpit
Press - ISBN 0-201-35493-4
There are lots of books about HTML available but I liked the
way this one is set out.